Your Cart is Empty

August 01, 2018

Dairy goats naturally have horns. At Goat Milk Stuff, we disbud our goats for their safety. If the goats were out in the wild, they would need their horns for protection. But when kept on the farm, the chance of their getting their horns caught in the fences is too great and could lead to them being seriously injured. And so we choose to disbud our goats when they are little.
Our basic setup includes a kid box to provide containment for the kid, clippers* to shave the top of the head, gloves* to protect the hands of the technicians, the disbudding iron*, and a fan* to pull the smoke away from the work area.

The first step is the part the kid hates most: the goofy haircut. We shave the hair on the top of the head to make it easier to see the horn buds which should be big enough to see and feel, but smaller than a gumdrop. If they're bigger than that, you've waited too long and may have to repeat the procedure to achieve results. The kid hates this part because we're holding him still, and the clippers are scary and noisy... not that you'll be able to hear the clippers over the hollering kid. This is your first clue that hollering kids have nothing to do with pain or discomfort.

After the trauma of the haircut, the horn buds are visible. If you are having trouble locating them, they're in line between the ear, and the opposite eye, as seen in the photo below.

Now would be a good time to make sure that fan is on, blowing away from the workspace so the smoke gets sucked away from you. Also get the gloves on and make sure the iron is red hot before getting started.
The kid is placed in the kid box, which is just a plywood box with a hole out the side for the head. A platform to rest the kid's chin on is helpful. The lead technician sits on the box lid so the kid's head is between the knees and easy to work with. Typically the dominant hand is used to hold the iron, while the other hand is used to hold down one ear, and keep the head from moving up and down by placing the thumb at the base of the skull and holding the head down on the chin-rest platform.

The assisting technician places a hand on the bridge of the kid's nose to keep the head from moving side-to-side. Care must be taken to not obstruct the breathing of the kid! The other hand can be used to help secure the head as well, if needed. The iron is applied directly over the horn bud, so the bud is encircled by the hot iron. Steady, light pressure is applied. Slightly tilting the iron toward each of the four points of the compass will help ensure good results.

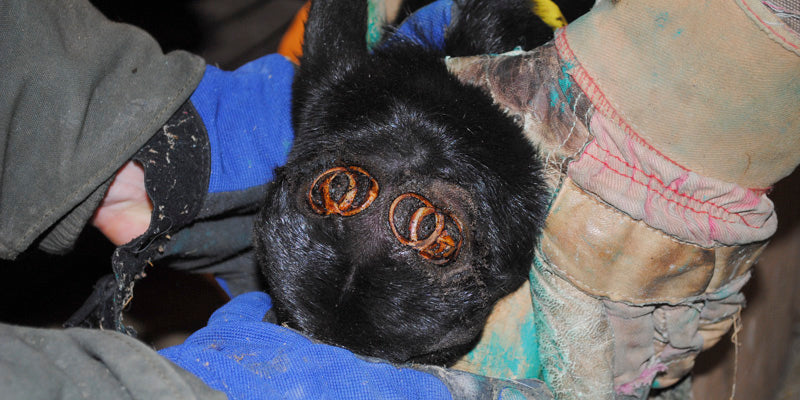
What you are looking for is a copper-colored ring that is unbroken around the entire horn bud. The amount of time for the iron to be applied depends upon the size of the buds, the age of the kid, and the technique of the individual doing it. That's a lot of variables, but we usually go from 5 seconds for a small, week-old doeling up to 12 seconds for a larger, two-week old buckling. That's the amount of time per ring. The skin that was covering the horn bud inside the ring can be removed as shown below. If you don't get a good copper ring on your first attempt, do it again paying close attention to the parts that were not copper-colored.

The other side is done the same way.

You can see there is some depth to the rings, but only about 1/16 of an inch. You do not want to cause brain damage, just prevent horns.

For doelings, the edge of the iron is used to create an X inside the circle to further discourage the horn bud from growing. This can be seen on the kid's left horn bud here.

But this is a buckling, so a more rigorous treatment is required to keep the nearly inevitable partial horns called "scurs" to a minimum. A second ring, with its outside edge directly on the center of the horn bud, and it's center on the existing ring, closer to the midline of the head, is made. To do this, the edge of the iron is pressed onto the center of the horn bud until it is about halfway through it, then the iron is tilted toward the midline of the head to create the rest of the copper-colored ring.

If there is bleeding, it can be cauterized with the iron. It's been years since we had any bleeding, so I think it probably has something to do with technique. More experience leads to better results, and faster results, so the kids don't holler as much. We sometimes also tattoo while we've got them in the box, which is why there's green all over the gloves and the box.

The kid will stop fussing as soon as he's out of the box and jump around like he was doing before his goofy haircut. It's a good idea to do more than one so they don't get teased by the others, but make sure that your iron is red hot again before you start the next one. If you do not give the iron adequate time to heat up between goats, you will have trouble with horns re-growing.

Over the next few weeks watch for any regrowth of horns, as your technique may not have been adequate for the goat. Again, lots of variables so it's impossible to give hard-and fast rules here, but these guidelines should get you going in the right direction.
Disclaimer: This information is provided as an example of how we personally raise goats at Goat Milk Stuff. We are not veterinarians and any information on the GMS website should not be taken as veterinary advice. Please seek the advice of a professional vet before making any changes to your herd management or individual treatment of your goat.
*Amazon affiliate linkComments will be approved before showing up.